Theming your GeoNode project
There are a range of options available to you if you want to change the default look and feel of your GeoNode project. Since GeoNode’s style is based on Bootstrap you will be able to make use of all that Bootstrap has to offer in terms of theme customization. You should consult Bootstrap’s documentation as your primary guide once you are familiar with how GeoNode implements Bootstrap and how you can override GeoNode’s theme and templates in your own project.
Logos and graphics
GeoNode intentionally does not include a large number of graphics files in its interface. This keeps page loading time to a minimum and makes for a more responsive interface. That said, you are free to customize your GeoNode’s interface by simply changing the default logo, or by adding your own images and graphics to deliver a GeoNode experience the way you envision int.
Your GeoNode project has a directory already set up for storing your own images at <my_geonode>/static/img. You should place any image files that you intend to use for your project in this directory.
Let’s walk through an example of the steps necessary to change the default logo.
Change into the
imgdirectory:$ cd <my_geonode>/static/img
If you haven’t already, obtain your logo image. The URL below is just an example, so you will need to change this URL to match the location of your file or copy it to this location:
$ wget http://www2.sta.uwi.edu/~anikov/UWI-logo.JPG
$ cd ../../..
Override the CSS that displays the logo by editing
<my_geonode>/static/css/site_base.csswith your favorite editor and adding the following lines, making sure to update the width, height, and URL to match the specifications of your image..nav-logo { width: 373px; height: 79px; background: url(../img/UWI-logo.JPG) no-repeat; }
Restart your GeoNode project and look at the page in your browser:
$ python manage.py runserver
Visit your site at http://localhost:8000/ or the remote URL for your site.
Custom logo
You can see that the header has been expanded to fit your graphic. In the following sections you will learn how to customize this header to make it look and function the way you want.
Note
You should commit these changes to your repository as you progress through this section, and get in the habit of committing early and often so that you and others can track your project on GitHub. Making many atomic commits and staying in sync with a remote repository makes it easier to collaborate with others on your project.
Cascading Style Sheets
In the last section you already learned how to override GeoNode’s default CSS rules to include your own logo. You are able to customize any aspect of GeoNode’s appearance this way. In the last screenshot, you saw that the main area in the homepage is covered up by the expanded header.
First, we’ll walk through the steps necessary to displace it downward so it is no longer hidden, then change the background color of the header to match the color in our logo graphic.
Reopen
<my_geonode>/static/css/site_base.cssin your editor and add the following rule after the one added in the previous step:.content-wrap { margin: 75px 75px; }
Add a rule to change the background color of the header to match the logo graphic we used:
.navbar .navbar-inner { background: #0e60c3; }
Your project CSS file should now look like this:
.nav-logo { width: 373px; height: 79px; background: url(../img/UWI-logo.JPG) no-repeat; } .content-wrap { margin: 75px 75px; } .navbar .navbar-inner { background: #0e60c3; }
Restart the development server and reload the page:
$ python manage.py runserver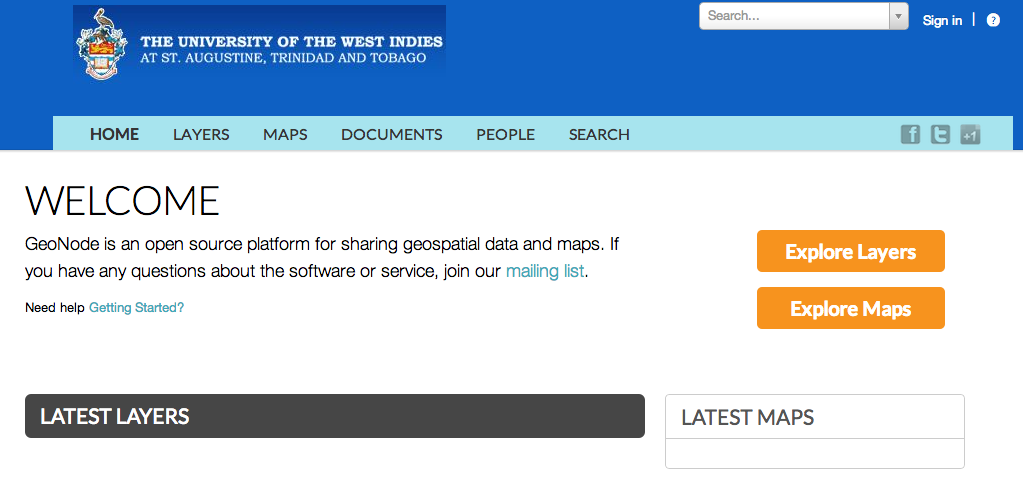
CSS overrides
Note
You can continue adding rules to this file to override the styles that are in the GeoNode base CSS file which is built from base.less. You may find it helpful to use your browser’s development tools to inspect elements of your site that you want to override to determine which rules are already applied. See the screenshot below. Another section of this workshop covers this topic in much more detail.
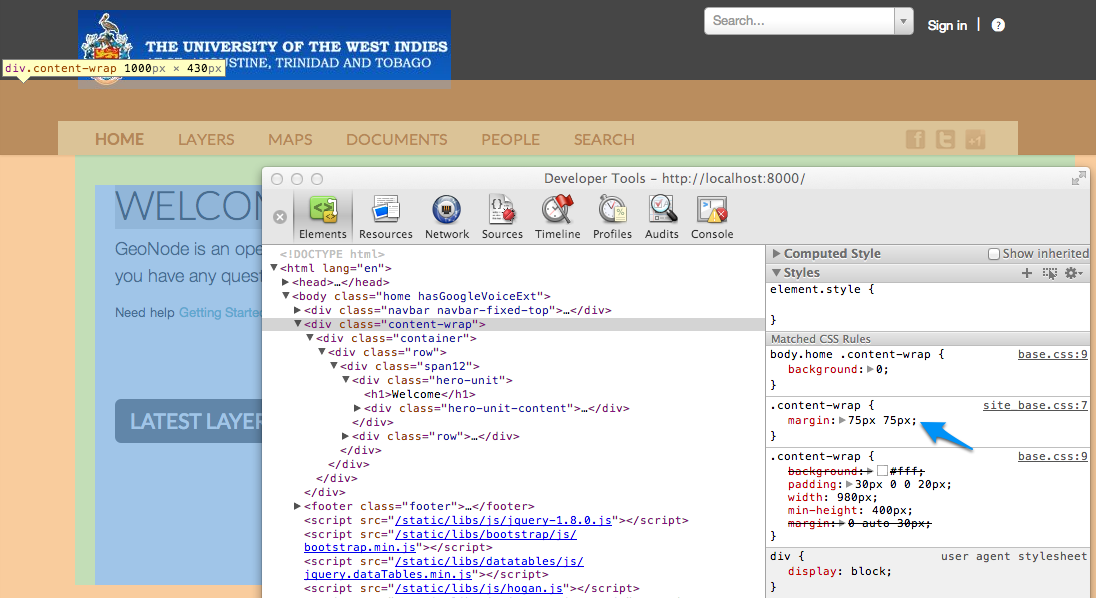
Screenshot of using Chrome’s debugger to inspect the CSS overrides
Templates and static pages
Now that we have changed the default logo and adjusted our main content area to fit the expanded header, the next step is to update the content of the homepage itself. Your GeoNode project includes two basic templates that you will use to change the content of your pages.
The file site_base.html (in <my_geonode>/templates/) is the basic template that all other templates inherit from and you will use it to update things like the header, navbar, site-wide announcement, footer, and also to include your own JavaScript or other static content included in every page in your site. It’s worth taking a look at GeoNode’s base file on GitHub. You have several blocks available to you to for overriding, but since we will be revisiting this file in future sections of this workshop, let’s just look at it for now and leave it unmodified.
Open <my_geonode>/templates/site_base.html in your editor:
{% extends "base.html" %}
{% block extra_head %}
    <link href="{{ STATIC_URL }}css/site_base.css" rel="stylesheet"/>
{% endblock %}
You will see that it extends from base.html, which is the GeoNode template referenced above and it currently only overrides the extra_head block to include our project’s site_base.css which we modified in the previous section. You can see on line 14 of the GeoNode base.html template that this block is included in an empty state and is set up specifically for you to include extra CSS files as your project is already set up to do.
Now that we have looked at site_base.html, let’s actually override a different template.
The file site_index.html is the template used to define your GeoNode project’s homepage. It extends GeoNode’s default index.html template and gives you the option to override specific areas of the homepage like the hero area, but also allows you leave area like the “Latest Layers” and “Maps” and the “Contribute” section as they are. You are of course free to override these sections if you choose and this section shows you the steps necessary to do that below.
Open
<my_geonode>/templates/site_index.htmlin your editor.Edit the
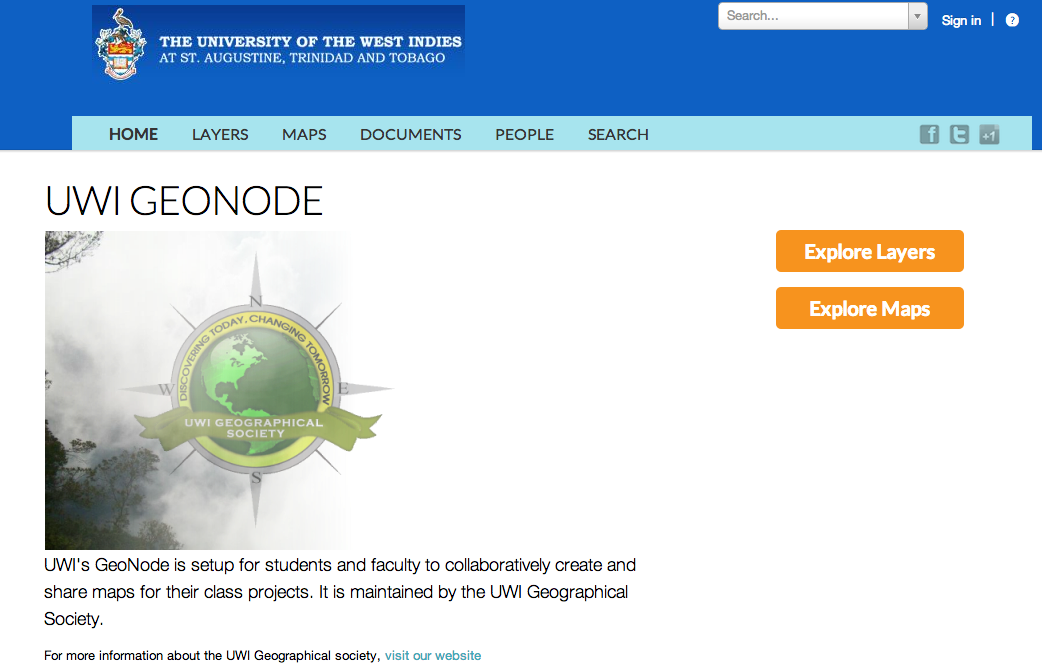
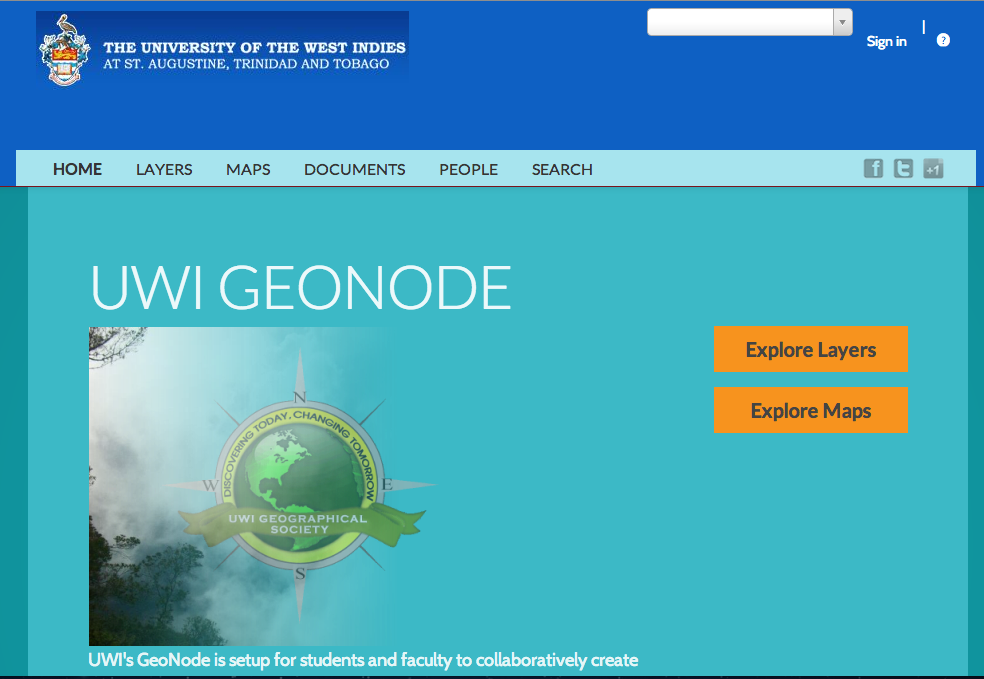
<h1>element on line 13 to say something other than “Welcome”:<h1>{% trans "UWI GeoNode" %}</h1>
Edit the introductory paragraph to include something specific about your GeoNode project:
<p>
    {% blocktrans %}
    UWI's GeoNode is setup for students and faculty to collaboratively
    create and share maps for their class projects. It is maintained by the
    UWI Geographical Society.
    {% endblocktrans %}
</p>
Change the Getting Started link to point to another website:
<span>
    For more information about the UWI Geographical society,
    <a href="http://uwigsmona.weebly.com/">visit our website</a>
</span>
Add a graphic to the hero area above the paragraph replaced in step 3:
<img src = 'http://uwigsmona.weebly.com/uploads/1/3/2/4/13241997/1345164334.png'>
Your edited
site_index.htmlfile should now look like this:{% extends 'index.html' %} {% load i18n %} {% load maps_tags %} {% load layers_tags %} {% load pagination_tags %} {% load staticfiles %} {% load url from future %} {% comment %} This is where you can override the hero area block. You can simply modify the content below or replace it wholesale to meet your own needs. {% endcomment %} {% block hero %} <div class="hero-unit"> <h1>{% trans "UWI GeoNode" %}</h1> <div class="hero-unit-content"> <div class="intro"> <img src = 'http://uwigsmona.weebly.com/uploads/1/3/2/4/13241997/1345164334.png'> <p> {% blocktrans %} UWI's GeoNode is setup for students and faculty to collaboratively create and share maps for their class projects. It is maintained by the UWI Geographical Society. {% endblocktrans %} </p> <span> For more information about the UWI Geographical society, <a href="http://uwigsmona.weebly.com/">visit our website</a> </span> </div> <div class="btns"> <a class="btn btn-large" href="{% url "layer_browse" %}"> {% trans "Explore Layers" %} </a> <a class="btn btn-large" href="{% url "maps_browse" %}"> {% trans "Explore Maps" %} </a> </div> </div> {% endblock %}Restart your GeoNode project and view the changes in your browser at http://localhost:8000/ or the remote URL for your site:
$ python manage.py runserver
From here you can continue to customize your site_index.html template to suit your needs. This workshop will also cover how you can add new pages to your GeoNode project site.
Other theming options
You are able to change any specific piece of your GeoNode project’s style by adding CSS rules to site_base.css, but since GeoNode is based on Bootstrap, there are many pre-defined themes that you can simply drop into your project to get a whole new look. This is very similar to WordPress themes and is a powerful and easy way to change the look of your site without much effort.
Bootswatch
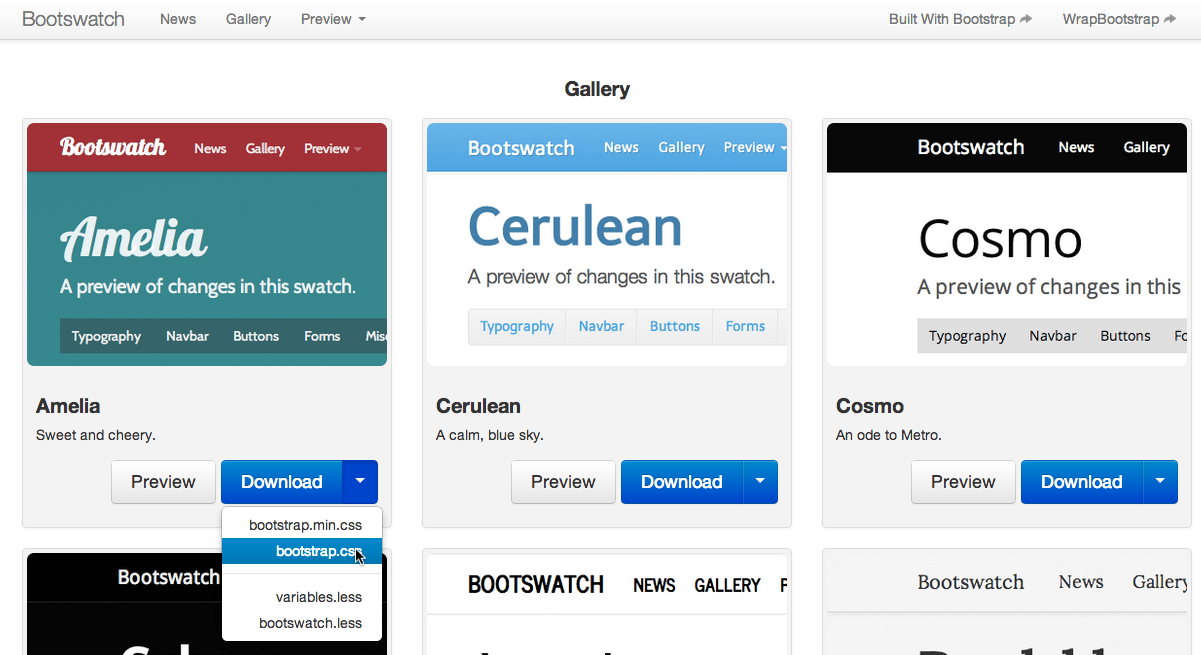
Bootswatch is a site where you can download ready-to-use themes for your GeoNode project site. The following steps will show you how to use a theme from Bootswatch in your own GeoNode site.
Visit http://bootswatch.com and select a theme (we will use Amelia for this example). Select the download bootstrap.css option in the menu:
Put this file in
<my_geonode>/static/css.Update the
site_base.htmltemplate to include this file. It should now look like this:{% extends "base.html" %} {% block extra_head %} <link href="{{ STATIC_URL }}css/site_base.css" rel="stylesheet"/> <link href="{{ STATIC_URL }}css/bootstrap.css" rel="stylesheet"/> {% endblock %}Restart the development server and visit your site:
Your GeoNode project site is now using the Amelia theme in addition to the changes you have made.